
Advent Calendar 2019
| Day 12 | Day 13 | Day 14 |
The gift is presented by Burkhard Nickels. Today he is talking about his solutions to Task #1: Demonstrate Array/Hash Slices of “The Weekly Challenge - 034”.
Demonstrate Array Slices or Hash slices.
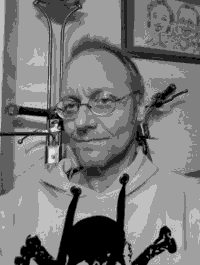
To demonstate some different Array and Hash slicing features I do some image processing. An image is “data” that can be stored in 2- or 3-dimensional Arrays. To separate the data I will store the data in Hashes (Named Lists). For example a coloured image can be separated in its ‘red’, ‘green’ and ‘blue’ parts.
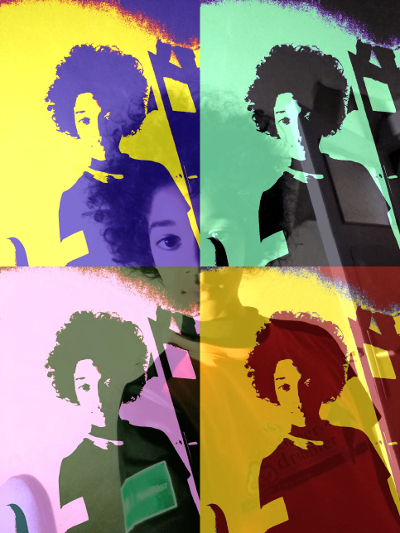
The source is a miraculous colored image from my son. This example creates a new miracle image (Some odd inheritance). I go two ways to solve it: (A) First I use PDL, the Perl Data Language. With PDL you can simply calculate big arrays of data. All operators can be used directly on the Piddle (PDL object). (B) Second I use Perl Arrays.
The steps done in this example are:
- Reading Image from PNG file: Using Hash
- Separate RGB and Bit Plane: Hash Slices
- Extract hidden image from Bit 0: Hash Slice
- Write hidden image to file: PDL::NiceSlice
- Comparision of execution time
SYNOPSIS
# perldoc ch-1.pl              - POD
./ch-1.pl <command>

# ./ch-1.pl pdl                - Creates Hidden Grayscale from Colored Image
# ./ch-1.pl array              - Array Version does NOT work properly
# ./ch-1.pl html               - HTML/CSS in ch-1.html/pwc.css
# ./ch-1.pl help               - Usage information
1) Reading Image from PNG file: General Usage of a Hash
A Hash is a List of Key/Value pairs, so that values can be accessed easily by a name (key). In Perl a Hash is declared with a percent sign “%” (i.e. %hash) in front of the name. The Hash can be initialized with key/value pairs.
%hash = ( key => $value, ... );       # Initialize Hash
$hash{ key } = $value;                # Assign Value to Hash Element
$var = $hash{ key };                  # Get Hash Value of Key
As example I read a PNG file and store every needed parameter in a hash. In the below example the keys base (basename of file), file (filename) and data (read PDL data) are used.
my %image = (                          # Initialize Hash
    base => "miraculous-image-400x533",
    file => "miraculous-image-400x533.png",
);
$image{data} = read_png($image{file}); # Assign Value to Hash Element
info_pdl($image{data},$image{file});   # Use Hash Values
2) Separating RGB and Bit Plane
Hash Slice
A Hash Slice represents more Hash elements at once. The At (@) sign is used to represent a hash slice.
@list = @hash{'key1','key2'};          # Access Hash Slice
@hash{ 'key1','key2','key3' } = ...;   # Assignment of Values to Hash Slice
A. Separation with PDL
In the example below we assign the RGB layers of the image to a Hash Slice. The rgb() function is doing it for us. Then we create a Hash Element named “bit_plane” and assign the bit planes (an array) of each color to the Hash Slice (‘red’,‘green’,‘blue’). This is done with the function bit_plane().
@image{ 'red','green','blue' } = rgb($image{data}); # Assigning values to Hash slice

my @colors = ('red','green','blue');
@{ $image{bit_plane} }{ @colors } = (   # Assigning values to Hash Slice
    [ bit_plane($image{red}) ],
    [ bit_plane($image{green}) ],
    [ bit_plane($image{blue}) ],
);
B. Separation with Array
Because we read the PNG file with PDL mechanisms, first we need to change the PDL object into an array. This we do with exchanging the order of the dimensions with PDL xchg(0,2) and with PDL unpdl() function.
Also for the Array-Solution we implemented a rgb_array() function that is separating the 3 RGB channels. Than the bit_plane_array() function is creating the Bit Planes
my $tmp1 = $image{data}->xchg(0,2);
$image{array} = $tmp1->unpdl;

@image{ 'red','green','blue' } = rgb_array($image{array});

my @colors = ('red','green','blue');
@{ $image{bit_plane} }{ @colors } = (   # Bit Plane
    bit_plane_array($image{red}),
    bit_plane_array($image{green}),
    bit_plane_array($image{blue}),
);
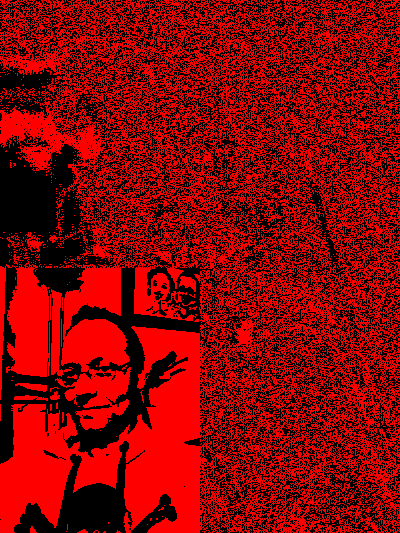
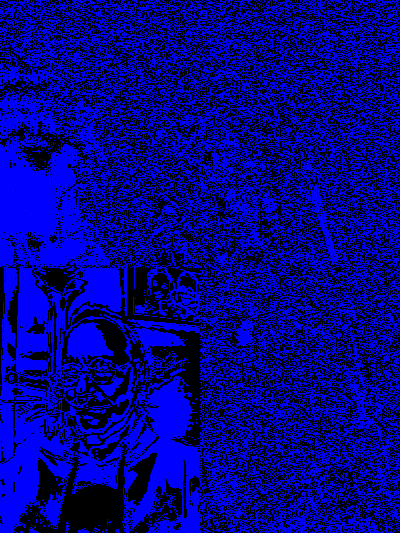
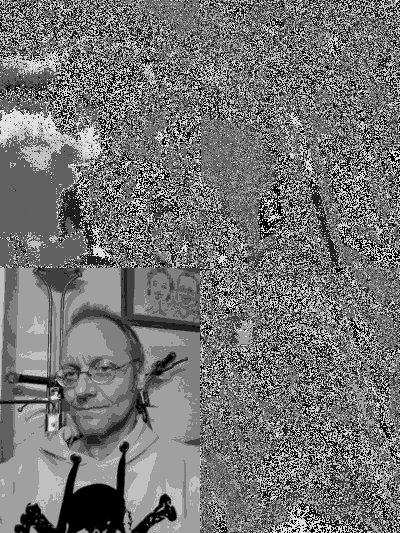
Bit Plane
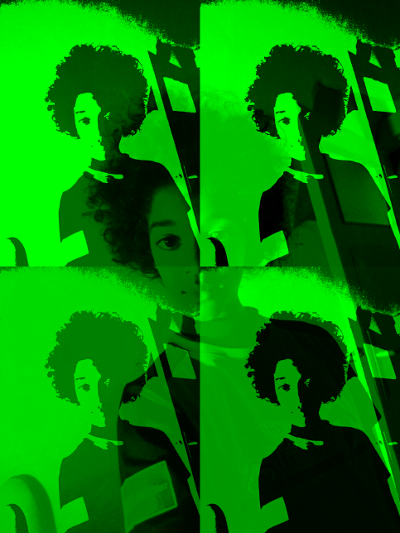
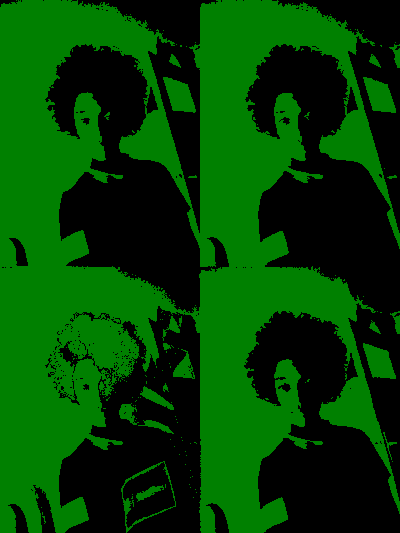
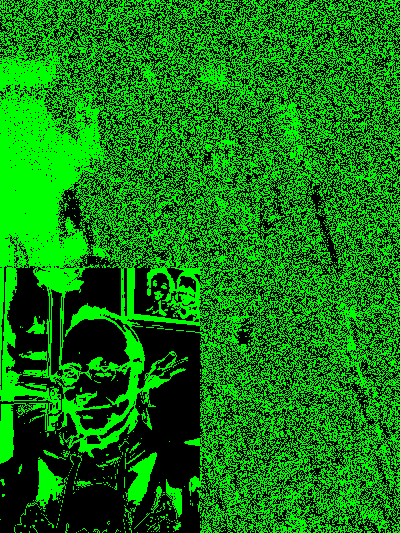
The following 3 Images are an extract of the previous operations. Every Pixel can have a value range from 0 - 255.
For the third image, Bit Mask on Bit 0 of Bit Plane, to make it visible I multiplied it with 255. Normally the values are only 0 / 1, so it would be a black image. When multiplied with 255, value 1 becomes 255, value 0 is still value 0. On the Green channel, Bit 6 of the hidden Image is available.
- Green Channel only. Green Value Range from 0 - 255.
- Green Channel Bit 7 of Bit Plane. Only Value 0 / 128, because of Bit Mask on Bit 7.
- Green Channel Bit 0 of Bit Plane, multiplied with 255.
About Image Data
The miraculous image has a size of 3x400x533. The image has a size width x height of 400x533 and is composed of 3 color values red/green/blue (RGB). Each value has 8 Bit means decimal from 0 to 255. One Red Pixel for example has the R/G/B values of 255/0/0.
When we first separate the RGB values, we assign to $image{red} an image of 400x533 only red pixel values. Afterwards we separate all 8 bit planes.
The 8 Bit Value of 255 is a binary value of 0b11111111. Separating the 8 bit planes means we create an array of only Bit 0 (LSB), only Bit 1, …, only Bit 7 (MSB). So the bit plane of Bit 7 can have value 0 or 1, means in decimal 0 or 128 (because of MSB).
Representation of Bits and Significancy:
Bit Number:    (MSB) 7           6           5           4   3  2  1  0 (LSB)
Binary Value:        0b10000000, 0b01000000, 0b00100000, ...
Decimal Value:       128,        64,         32,         16, 8, 4, 2, 1
So the most information of an image is in the highest bits. Only with Bits 5-7 it is possible to get a visible image out of the data. In Bit 0 is the least information of the image, this is rather some image noise in the LSB.
3) Compose hidden image from Bit 0
So in Bit 0 (Least Significant, Noise) of each RGB Value you can hide the Bits 5-7 (Most Significant) of another image. I separated a grayscale image in its bit plane and put these 3 bit planes from Bit 5-7 into the Bit 0 of the RGB. To extract the hidden image the process is vice versa.
The Bits extracted from the coloured image are in Bit position 0, means they need to be shifted to their original position. That is Bit 7/6/5. For this we can use the “Shift” « operator. Than the 3 Bytes with their proper position must be binary ORed with the OR | operator. Both operator exist in PDL as well for Scalars.
A. Compose hidden image with PDL
With PDL a whole Matrix can be Shifted and ORed at once. This is done in one single line.
my %hidden;
@hidden{ 'bit7','bit6','bit5' } = (
    $image{bit_plane}{red}[0],
    $image{bit_plane}{green}[0],
    $image{bit_plane}{blue}[0],
);
$hidden{data} = ($hidden{bit7} << 7) | ($hidden{bit6} << 6) | ($hidden{bit5} << 5);
The first 3 PNG files are from @hidden{‘bit7’,‘bit6’,‘bit5’}, all three multiplied with 255. In the code above each image (bit position) is shifted up to the proper position for the resulting image. The fourth image is from $hidden{data}, and is the composed image out of the other three.

B. Compose hidden image with Array
With a Perl Array we must iterate through every element to shift and OR every single element. I implemented the recreate() function for this task.
The recreate() function puts the bits 7/6/5 together to one image. The perl array is converted back to a PDL object, because we write the data to a PNG file with PDL. The PDL xchg() function has to exchange the dimensions of the data.
@hidden{ 'bit7','bit6','bit5' } = (
    $image{bit_plane}{red}[0],
    $image{bit_plane}{green}[0],
    $image{bit_plane}{blue}[0],
);
my $tmp1 = recreate(@hidden{'bit7','bit6','bit5'});

my $tmp2 = pdl(byte(),$tmp1);
$hidden{data} = $tmp2->xchg(0,1);
$res = recreate($bit7,$bit6,$bit5)
To put Bits 7/6/5 together I have to iterate through every value of that image matrix (array). Each bit needs to be shifted from bit position 0 (LSB) to the appropriate position (7/6/5). Afterwards the Bytes with the proper bit position needs to be binary ORed to one value. This one value is stored in the resulting array at its indices.
sub recreate {
    my ($bit7,$bit6,$bit5) = @_;
    my @res;
    for( my $w=0; $w<=$#$bit7; $w++ ) {   # Iterate Column
            my $col = $bit7->[$w];
            for( my $h=0; $h<=$#$col; $h++ ) {  # Iterate Row
                    my $v7 = $bit7->[$w][$h] << 7;  # Shift to Bit 7
                    my $v6 = $bit6->[$w][$h] << 6;  # Shift to Bit 6
                    my $v5 = $bit5->[$w][$h] << 5;  # Shift to Bit 5
                    $res[$w][$h] = $v7 | $v6 | $v5; # Binary OR
            }
    }
    return \@res;    # Return resulting image
}
4) Write hidden image to file: PDL::NiceSlice
The hidden image was a grayscale with size 200x265. So I create an empty PDL object with this size and assign a PDL::NiceSlice of that size from the composed data. Afterwards the data is written to file.
$hidden{slice} = zeroes(byte(),200,265);
my $tmp = $hidden{data};
$hidden{slice} .= $tmp(0:199,0:264);
write_png($hidden{slice},"hidden-200x265.png");
So this is our final result:
5) Comparision of Execution Time
The measurement of the time to extract the hidden image from the vessel results in 4.52 sec for the Array Solution and 0.06 sec for the PDL Solution. Details see below.
A. Execution Time of Array Solution:
./ch-1.pl array
ch-1.pl (Version 1.0) PWC #34 Task #1: Argument - array
TIME: read_png(): 0.029254
TIME: read_image: 0.0293169021606445
TIME: bit_plane_array(): 1.379272
TIME: bit_plane_array(): 1.385368
TIME: bit_plane_array(): 1.380695
TIME: extract_bit_plane: 4.21236300468445
TIME: create_hidden: 0.25209
Write PNG file hidden-array-200x265.png
TIME: write_png(): 0.029869
    hidden-array-200x265.png:  Type byte (0) Dims 2 (200/265) #Ele 53000 Sum  6348672
TIME: main(): 4.524511
B. Execution Time of PDL Solution:
./ch-1.pl pdl
ch-1.pl (Version 1.0) PWC #34 Task #1: Argument - pdl
TIME: read_png(): 0.028898
TIME: read_image: 0.0289709568023682
TIME: bit_plane(): 0.003825
TIME: bit_plane(): 0.003659
TIME: bit_plane(): 0.003666
TIME: extract_bit_plane: 0.0113928318023682
TIME: create_hidden: 0.00251
Write PNG file hidden-pdl-200x265.png
TIME: write_png(): 0.018439
    hidden-pdl-200x265.png:  Type byte (0) Dims 2 (200/265) #Ele 53000 Sum  6348672
TIME: main(): 0.062353
Basic Functions
Some basic functions are used in this example.
$data = one_color($rgb_data,$color);    # Creates rgb image from one color channel
$data = read_png($filename);            # Reads image data from PNG file.
write_png($data,$filename);             # Writes image data to PNG file.
@bit_planes = bit_plane($data,$type);   # Separates bit planes.
$bit_planes = bit_plane_array($data,$type); # Separates bit planes.
($red,$green,$blue) = rgb($data);       # Separates red/green/blue from Color Image.
($red,$green,$blue) = rgb_array($data); # Separates red/green/blue from Color Image.
info_array($array_ref);                 # Prints Array Size to STDOUT.
info_pdl($data,$title);                 # Prints PDL Info to STDOUT.
Because two different solutions are implemented in this script, I wanted to compare both related to time behaviour. For this reason I used the module Time::HiRes. The following code I inserted to measure the time.
use Time::HiRes qw(gettimeofday tv_interval);
...

my $t0 = [gettimeofday];

... (measured code)

my $t1 = [gettimeofday];
my $td = tv_interval $t0, $t1;
print "TIME: bit_plane(): $td\n";
$data = one_color($rgb_data,$color)
The function one_color() creates a RGB image with one color channel set to its value, but the two other colors are set to zero. This is done to better visualize the splitted channels of a RGB image.
sub one_color {
    my ($img,$color) = @_;   # $color = red|green|blue

    # ------- Create image data of same dimension with only zeroes
    my $result = zeroes(byte(),3,$img->dims);

    # ------- Assign image data to choosen channel
    my %c = ( red=>0, green=>1, blue=>2 );
    for(my $i=0; $i<3; $i++) {
            if($i == $c{$color}) { $result(($i),:,:) .= $img; }     # PDL::NiceSlice
    }
    return ($result); # Return new image
}
$data = read_png($filename);
Reads an image file with PNG format and returns the PDL data.
sub read_png {
    my ($png) = @_;
    my $cr = PDL->rpiccan('PNG');   # is PNG format allowed
    if(! $cr ) { print "Error (read): Png not allowed!\n"; return 0; }
    my $tmp = PDL::IO::Pic::rpic($png, {FORMAT => 'PNG'}); # read image
}
write_png($data,$filename);
Writes a PDL image as PNG file.
sub write_png {
    my ($img,$png) = @_;
    my $cr = PDL->wpiccan('PNG');   # is PNG format allowed
    if(! $cr ) { print "Error (write): Png not allowed!\n"; return 0; }
    PDL::IO::Pic::wpic($img,$png, {FORMAT => 'PNG'}); # write image
}
A. @bit_planes = bit_plane($data,$type);
Separates image $data in its @bit_planes. The $type can be ‘raw’|‘msb’|‘lsb’. This function takes only a 2-dimensional array, i.e. a grayscale image or only one color of a RGB image. All the operations are done on the whole image matrix at once. This is the advantage the PDL module gives to us.
It returns an array of 8 images, for each bit plane one separate image.
Let me give an example: A grayscale pixel has a decimal value of 255. The binary value is 0b11111111.
Each bit is masked in the for loop:
Pixel      & Mask       = Bit Plane (raw)            = (lsb)      = (msb)
0b11111111 & 0b00000001 = 0b00000001 = $bit_plane[0] = 0b00000001 = 0b10000000
0b11111111 & 0b00000010 = 0b00000010 = $bit_plane[1] = 0b00000001 = 0b10000000
0b11111111 & 0b00000100 = 0b00000100 = $bit_plane[2] = 0b00000001 = 0b10000000
...
What is the meaning of the $type argument? (raw, lsb, msb)
row
The masked bit is on the same position in the byte than the original bit.
lsb
The masked bit is shifted down to the LSB position (bit 0). This is needed because I want to hide the MSB of the hidden image in the LSB of the vessel image. So I need to shift the MSB down to the LSB.
msb
The masked bit is shifted up to the MSB position (bit 7). This can be useful in case you want to see the Bit Plane as an image. When you have binary values 0/1 on LSB the grayscale has a decimal value of 0/1, so you can not see the difference. When you have binary values 0/1 on MSB, the grayscale has a decimal value of 0/128, this difference in intensity you can see in an image.
sub bit_plane {                                    # $type = raw|lsb|msb
    my ($layer,$type) = @_;
    $type = "raw" if not $type;
    my @bit_plane;                                   # resulting bit plane
    my $mask = PDL::Core::pdl(PDL::Core::byte(),
        0b00000001);                                 # initial mask on LSB
    for(my $i=0;$i<=7;$i++) {                        # iterate bit 0 to bit 7
        $bit_plane[$i] = $layer & $mask;               # mask image
        $mask = $mask << 1;                            # shift mask to bit 1
        if($type eq "lsb") {
            $bit_plane[$i] = $bit_plane[$i] >> $i;       # shift to LSB
        }
        elsif($type eq "msb") {
            $bit_plane[$i] = $bit_plane[$i] << (7 - $i); # shift to MSB
        }
    }
    return @bit_plane;                               # return bit plane
}
B. $bit_planes = bit_plane_array($data,$type)
The bit_plane_array() function is doing the same as the bit_plane() function. Only the implementation is different, that it needs to iterate through every array element and also through all eight bits. Every Pixel value is binary ANDed & with a Mask. The same Option $type exists, to keep the Bit in its original position “raw”, to put the Bit in LSB “lsb” or to put the Bit in MSB “msb”.
sub bit_plane_array {                       # raw|lsb|msb
    my ($layer,$type) = @_;
    $type = "raw" if not $type;
    my @bit_plane;
    my $mask = 0b00000001;                    # Initialize Mask
    my $act_mask = $mask;
    for( my $w=0; $w<=$#$layer; $w++ ) {      # Iterate Column
        my $col = $layer->[$w];
        for( my $h=0; $h<=$#$col; $h++ ) {      # Iterate Row
            $act_mask = $mask;
            for(my $i=0;$i<=7;$i++) {                     # Iterate Mask
                my $val = $col->[$h];                         # Value
                $bit_plane[$i][$w][$h] = $val & $act_mask;    # Binary AND: Value & Mask
                $act_mask = $mask << $i;                      # Shift Mask
                if($type eq "lsb") {
                    $bit_plane[$i][$w][$h] = $bit_plane[$i][$w][$h] >> $i;
                }
                elsif($type eq "msb") {
                    $bit_plane[$i][$w][$h] = $bit_plane[$i][$w][$h] << (7 - $i);
                }
            }
        }
    }
    return \@bit_plane;                       # Return Bit Plane
}
A. ($red,$green,$blue) = rgb($data);
Returns the RED/GREEN/BLUE layers of a coloured image PDL $data. The separation is done with the PDL::NiceSlice module. So it is an easy task.
sub rgb {
    my ($img) = @_;
    my $red   = $img((0),:,:);      # PDL::NiceSlice
    my $green = $img((1),:,:);
    my $blue  = $img((2),:,:);
    return ($red,$green,$blue);
}
B. ($red,$green,$blue) = rgb_array($data);
The function rgb_array() is rather easy, it only returns the Array Slice.
sub rgb_array {
    my ($img) = @_;
    return @{$img}[0..2];    # Array Slice
}
A. info_array($array_ref)
The function info_array() prints the size of the array to STDOUT. This can be helpful to debug the image processing, to see the size of some resulting image array.
sub info_array {
    my ($aref) = @_;
    print "Array: Size ";
    print "$#{$aref}" if ref($aref) eq "ARRAY";
    print " x $#{$aref->[0]} " if ref($aref->[0]) eq "ARRAY";
    print " x $#{$aref->[0]->[0]}" if ref($aref->[0][0]) eq "ARRAY";
    print "\n";
}
B. info_pdl($data,$title)
The function info_pdl() prints some information of the PDL data to STDOUT. This can be helpful to debug the image processing, to see the size and some other data of some resulting image PDL.
Some PDL functions are used to get this information, i.e. get_datatype(), ndims(), nelem(), dims() and sum().
sub info_pdl {
    my ($image,$title) = @_;
    my $dt = $image->get_datatype;
    my @type = ("byte","short","ushort","long","indx","unknown","float","double");

    my $str = "$title: ";
    $str .= " Type " . $type[$dt]    . " (" . $dt . ")";
    $str .= " Dims " . $image->ndims . " (" . join("/",( $image->dims )) . ")";
    $str .= " #Ele " . $image->nelem;
    $str .= " Sum  " . $image->sum . "\n";
    print $str;
    return $str;
}
If you have any suggestion then please do share with us perlweeklychallenge@yahoo.com.