DISCLAIMER: Image is generated using ChatGPT.
Sometimes ago, I created a blog post on the subject, WebSocket. The post titled, Mojolicious with WebSocket, was well received. So I decided to create a dedicated GitHub repository. It allowed me to re-create the application using different backends as listed below:
- Chat Server with Redis
- Chat Server with PostgreSQL
- Chat Server with PAGI
- Chat Server with Thunderhorse
Having done, WebSocket, I decided to explore Webhook next.
Imagine ordering some pizza online and feeling very hungry at the moment.
You could check every two minutes with the front counter if your pizza was ready yet by saying, “Is it ready yet? How about now? Now?” Not only would this be exhausting for you, but it would also be maddeningly annoying towards the person at the counter.
In the software world, this repetitive process is called API Polling. For a long time, it was the only means of communication between apps, until there was a more efficient and sophisticated way to accomplish the same thing.
Instead of the customer standing at the counter while the pizzeria worked on your pizza and asking how long until it would be ready, you give the pizzeria your phone number, go home to your couch, and the pizzeria texts you the precise moment the pizza leaves the oven.
That approach of "text me when it is done" is an example of a Webhook.
What is a Webhook?
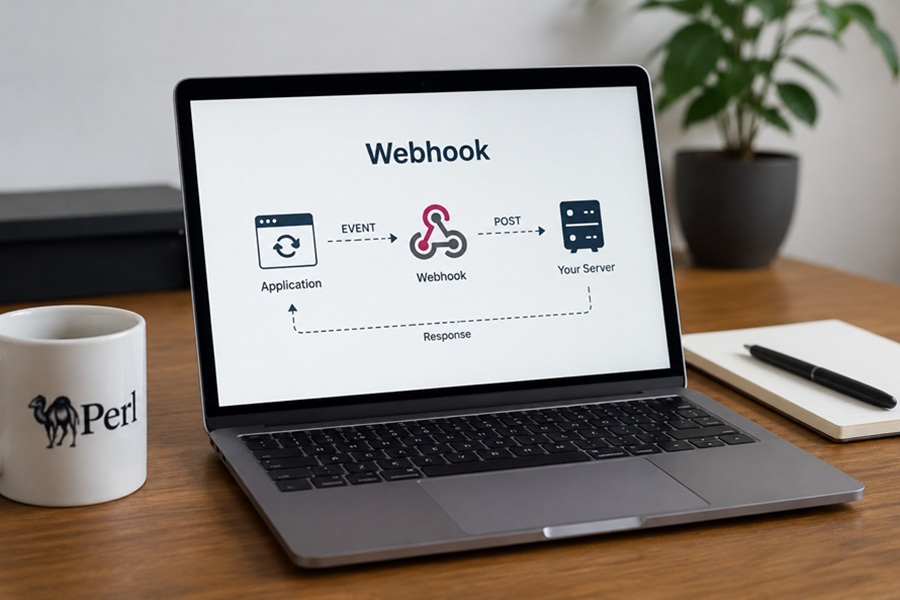
A Webhook is a way in which one app provides another application with real-time information. It is also known as a "reverse API" or "HTTP push".
By using webhooks, the provider server will automatically send your application the updated data at the exact milliseconds that the event occurred instead of requiring your application to continually ask the other server if an update was available.
How does it work?
A webhook is set up with two elements: an event from an app and the location of where that event is to be sent.
Setting up the Webhook
You’ll need the URL from your application, App B, to be able to send the information from App A to that URL.
The URL will act as the 'mailbox' for the webhook.
The Event: An event (customer successfully purchasing a subscription) occurs in
App A.
The Payload:
App Apackages together all the information about the customer’s purchase, in a single package (usuallyJSON).
Delivery:
App Athen posts a request (viaHTTP POST) containing the payload toApp B’s URL, once sent,App Breads the payload and updates its records accordingly.
In short:
Polling(App to Server): Your app sends a query to the server at regular intervals to find out if there are any new updates.
Webhooks(Server to Server): A server pushes data to another server only when an event occurs. This creates a one-way street that is commonly used in back-end automation.
WebSockets(Client to Server): A client connects to the server via an open, two-way highway, allowing for immediate bi-directional data transfer. This allows for real-time interactive applications.
Demo
Here is the micro-web application built using the Mojolicious::Lite framework. It acts as both a Webhook Receiver (catched the webhook events) and a Dashboard that shows those events in real time.
The application, logger.pl, spins up a local server and sets up four main endpoints.
The Receiver
It listens for incoming webhooks and implements a critical security best practice, Cryptographic Signature Verification.
use Time::Piece;
use Mojolicious::Lite -signatures;
use Digest::SHA qw(hmac_sha256_hex);

my $SECRET = 'your_super_secret_key';

post '/demo-webhook' => sub ($c) {
    my $signature = $c->req->headers->header('X-Hub-Signature-256') // '';
    my $payload   = $c->req->body;
    my $expected  = 'sha256=' . hmac_sha256_hex($payload, $SECRET);

    unless (constant_time_compare($signature, $expected)) {
        return $c->render(json => { error => 'Forbidden' }, status => 403);
    }

    $c->render(json => { status => 'accepted' }, status => 202);

    if (fork == 0) {
        sleep 5;
        open my $fh, '>>', 'events.log';
        my $time = localtime->datetime;
        say $fh "[$time] Processed: $payload";
        close $fh;
        exit; # Child process finishes
    }
};

sub constant_time_compare ($a, $b) {
    return 0 unless length($a) == length($b);
    my $result = 0;
    for my $i (0 .. length($a) - 1) {
        $result |= ord(substr($a, $i, 1)) ^ ord(substr($b, $i, 1));
    }
    return $result == 0;
}
The Dashboard
get '/logs' => sub ($c) {
    $c->render(inline => q{
        <!DOCTYPE html>
        <html class="dark">
        <head>
            <script src="https://cdn.tailwindcss.com"></script>
            <style>
                .glass { background: rgba(31, 41, 55, 0.7); backdrop-filter: blur(10px); }
            </style>
        </head>
        <body class="bg-gray-950 text-gray-200 min-h-screen font-sans">
            <nav class="border-b border-gray-800 p-4 flex justify-between items-center bg-gray-900">
                <h1 class="text-xl font-semibold tracking-tight text-white">
                    Webhook<span class="text-blue-500">Monitor</span>
                </h1>
                <div class="flex items-center gap-2">
                    <div class="h-3 w-3 rounded-full bg-green-500 animate-pulse"></div>
                    <span class="text-xs text-gray-400">Live Connection</span>
                </div>
            </nav>

            <main class="max-w-5xl mx-auto mt-8 px-4">
                <div class="glass border border-gray-800 rounded-xl overflow-hidden shadow-2xl">
                    <div class="bg-gray-900 px-6 py-4 border-b border-gray-800 flex justify-between">
                        <span class="text-sm font-medium uppercase tracking-wider text-gray-400">
                            Event History
                        </span>
                        <button onclick="clearLogs()"
                                class="text-xs text-red-400 hover:text-red-300">
                            Clear Logs
                        </button>
                    </div>
                    <div id="log-container" class="divide-y divide-gray-800">
                    </div>
                </div>
            </main>

            <script>

            async function clearLogs() {
                if (confirm("Are you sure you want to clear all logs?")) {
                    await fetch('/logs/clear', { method: 'POST' });
                    updateLogs();
                }
            }

            async function updateLogs() {
                const timestamp = new Date().getTime();
                const response = await fetch(`/logs/raw?t=${timestamp}`);

                if (!response.ok) return;

                const text      = await response.text();
                const container = document.getElementById('log-container');
                const lines     = text.trim().split('\n').filter(l => l.length > 0);

                container.innerHTML = lines.reverse().map(line => {
                const parts     = line.split('] ');
                const timestamp = parts[0] + ']';
                const message   = parts[1] || line;

                return `
                    <div class="py-4 px-6 hover:bg-gray-800/50 transition flex items-center gap-4">
                        <span class="text-xs font-mono text-gray-500 w-40 flex-shrink-0">
                            ${timestamp}
                        </span>
                        <span class="text-sm font-mono text-blue-300 bg-blue-900/20 px-2 py-0.5 rounded">
                            POST
                        </span>
                        <span class="text-sm text-gray-300">${message}</span>
                    </div>
                `;
                }).join('');

            }
            setInterval(updateLogs, 2000);
            </script>
        </body>
        </html>
    });
};
Data Layer
GET /logs/raw simply reads the events.log file using the system cat command and returns the plain text results.
get '/logs/raw' => sub ($c) {
    my $content = -e 'events.log' ? `cat events.log` : "No events yet.";
    $c->render(text => $content);
};
POST /logs/clear wipes out the events.log file so you can start fresh.
post '/logs/clear' => sub ($c) {
    open my $fh, '>', 'events.log' or die "Could not open file: $!";
    close $fh;
    $c->render(json => { status => 'cleared' });
};
Start Application
app->start;
Walkthrough the Process
In Terminal 1, start the deamon.
$ perl logger.pl daemon
[2026-06-10 11:36:14.38595] [392364] [info] Listening at "http://*:3000"
Web application available at http://127.0.0.1:3000
In Terminal 2, simulating a Webhook Provider
- Define the secret shared between the sender and the receiver
$ SECRET="your_super_secret_key"
- Define the JSON payload representing the event
$ PAYLOAD='{"action": "button_clicked", "user": "test_user"}'
- Generate the signature using
OpenSSL
$ SIG=$(echo -n "$PAYLOAD" | openssl dgst -sha256 -hmac "$SECRET" | sed 's/^.* //')
- Fire the webhook to your local application
$ curl -X POST http://127.0.0.1:3000/demo-webhook \
       -H "Content-Type: application/json" \
       -H "X-Hub-Signature-256: sha256=$SIG" \
       -d "$PAYLOAD"
{"status":"accepted"}
If you open a browser window and navigate to http://127.0.0.1:3000/logs, you will see the Webhook Monitor UI.

Happy Hacking !!!